实验环境:
centos 6.5 x64
rpm -ivh https://dl.fedoraproject.org/pub/epel/epel-release-latest-6.noarch.rpm
yum install ansible -y
vim /etc/ansible/hosts

[testhost]
192.168.28.70
[root@localhost ~]# ansible all -a 'who'
192.168.28.70 | SUCCESS | rc=0 >>
root pts/0 2017-07-11 04:13 (192.168.28.186)
root pts/2 2017-07-11 04:18 (192.168.28.186)
root pts/1 2017-07-11 04:45 (192.168.28.186)
[root@localhost ~]# ansible all -m ping
192.168.28.70 | SUCCESS => {
 "changed": false,
 "ping": "pong"
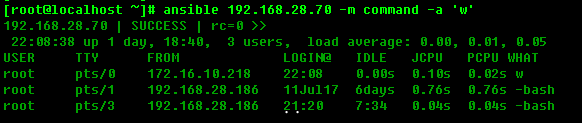
[root@localhost ~]# ansible testhost -m command -a 'w'

注意:”-m” 指定模块名,”-a” 指定相应命令,这样就可以批量执行命令。这里的 testhost 为之前自定义的主机组名。当然我们也可以直接写一个 ip,针对某一台机器来执行命令。如下:
1、创建一个shell脚本
[root@localhost ~]# cat /tmp/test.sh
#!/bin/bash
 echo `date` > /tmp/ansible_shell.log
2、把脚本分发到远程主机
[root@localhost ~]# ansible testhost -m copy -a "src=/tmp/test.sh dest=/tmp/test.sh mode=0755"
192.168.28.70 | SUCCESS => {
 "changed": true,
 "checksum": "032e736ac2c71a85c09cbef25190e404aa7eb7e8",
 "dest": "/tmp/test.sh",
 "gid": 0,
 "group": "root",
 "md5sum": "874449f8733ff8aaece2a5859b0d4446",
 "mode": "0755",
 "owner": "root",
 "secontext": "unconfined_u:object_r:admin_home_t:s0",
 "size": 53,
 "src": "/root/.ansible/tmp/ansible-tmp-1500430217.04-122496835634479/source",
 "state": "file",
 "uid": 0
}
3、执行脚本
[root@localhost ~]# ansible testhost -m shell -a "/tmp/test.sh"
192.168.28.70 | SUCCESS | rc=0 >>
[root@localhost ~]# ansible testhost -m copy -a "src=/etc/ansible/ansible.cfg dest=/tmp/ansibletet.txt owner=root group=root mode=0644"
192.168.28.70 | SUCCESS => {
 "changed": true,
 "checksum": "bd6fddebe99a0a92d02e9e198d34c406186edc87",
 "dest": "/tmp/ansibletet.txt",
 "gid": 0,
 "group": "root",
 "md5sum": "80f6c7c933dd1ca1c626ebffa3ddb8ed",
 "mode": "0644",
 "owner": "root",
 "secontext": "unconfined_u:object_r:admin_home_t:s0",
 "size": 18066,
 "src": "/root/.ansible/tmp/ansible-tmp-1500430393.64-228538002701013/source",
 "state": "file",
 "uid": 0
}
[root@localhost ~]# ansible testhost -m copy -a "src=/etc/ansible/ dest=/tmp/ansibletest owner=root group=root mode=0644"
192.168.28.70 | SUCCESS => {
 "changed": true,
 "dest": "/tmp/ansibletest/",
 "src": "/etc/ansible"
}
[root@localhost ~]# ansible testhost -m cron -a "name='test_cron' job='/bin/touch /tmp/test.txt' hour='1,5,10' weekday=1"
192.168.28.70 | SUCCESS => {
 "changed": true,
 "envs": [],
 "jobs": [
 "test_cron"
 ]
}
[root@bogon ~]# crontab -l
#Ansible: test_cron
* 1,5,10 * * 1 /bin/touch /tmp/test.txt
若要删除该cron ,只需要加一个字段 state=absent
[root@localhost etc]# ansible testhost -m cron -a "name='test_cron' state=absent"
192.168.28.70 | SUCCESS => {
 "changed": true,
 "envs": [],
 "jobs": []
}
我们来安装一个httpd服务
[root@localhost etc]# ansible testhost -m yum -a "name=httpd"
开启 httpd服务,并关闭开机启动
[root@localhost etc]# ansible testhost -m service -a "name=httpd state=started enabled=no"
[root@localhost etc]# ansible-doc -l
[root@localhost etc]# ansible-doc cron

 萌导航
萌导航 pp加速器
pp加速器 邮乐网
邮乐网 yowa云游戏手机版
 哈屏壁纸免费版
 安卓壁纸大师app
 webtoon漫画中文版
 小黄人影视2024最新版
 南瓜车管家
南瓜车管家 锦江酒店
锦江酒店 看怀集
看怀集 抬腕应用商店最新
 腾讯会议手机版
 圣婴阅读
圣婴阅读 柠檬英语软件
 苗苗清理大师
 夸磁浏览器app
 提瓦特小助手安卓版
 硬汗健身
硬汗健身 亲亲漫画
亲亲漫画