本文给出了一个在Windows平台上实现批量截图和创建网页缩略图功能的PHP IECapt实例。分享给大家参考,如下:
最近在一个本地互联网应用项目的开发中,为了增加用户体验,需要在搜索结果的左侧显示一个网站的缩略图效果,如图1所示。百度谷歌上了一上午网后,发现大部分都能实现少量截图。如果大量截图中间总会有很多问题,最后也找不到满意的程序,那就自己动手吧。
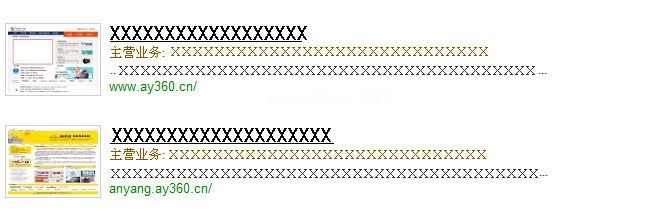
(图1)
以下是在windows环境下用php和iecapt创建网页缩略图和截图的步骤和代码:
首先,准备
下载最新版本的IECapt
官方地址:http://iecapt.sourceforge.net/
在linux环境下,我们可以考虑用HTML2Image来实现
下载地址:http://www.guangmingsoft.net/htmlsnapshot/html2image.i386.tar.gz.
其他实现包括CutyCapt另外,只要是带IE浏览器的windows环境(推荐IE7),大部分机器应该都不是问题。
第二,创建数据表(这一步没有必要,根据实际情况而定)
因为批量截图的数据很多,需要建立一个数据表来存储截图网站的url地址,如下图(mysql数据库表):
CREATE TABLE IF NOT EXISTS ` t _ URL `(` id ' int(11)无符号NOT NULL AUTO_INCREMENT,` URL ' varchar(100)NOT NULL,` pictbype ` tinyint(1)无符号not null comment' 1。非比例缩略图2比例缩略图` flag`tinyint (1)不为null默认' 1 '注释' 0。禁用1。PRIMARY KEY (`id ')可用)Engine=myisam默认字符集=gbkcomment=' URL链接表' AUTO _ INCREMENT=1;第三,创建批处理文件
1.首先,解压缩下载的iecapt压缩包,然后将iecapt.exe放在文件夹中生成截图(例如,img_tmp)。
为了便于理解,在阅读下面的代码之前,首先创建一个test.bat文件,右键单击编辑它,如果不存在写一个句子ay360cn.jpg(iec apt . exe-URL=http://www.ay360.cn/-out=ay360cn.jpg)保存它,双击运行test.bat,看看这个目录中是否会有一个名为ay360cn.jpg的附加文件。如果你看到说明,
2.将需要截图的url链接导入到url链接表t_url中,然后执行下面的php代码:
?PHP///。MySQL _ select _ db(' test ');$sql='从t_url中选择* ';//选择sql语句$ sql2='从t _ URL中选择*其中pictype=1,flag=1 ';$ query=MySQL _ query($ SQL);//-生成批处理文件//。//代表10天,文件到期时间,86400秒/天$ I=0;foreach($ row=MySQL _ fetch _ array($ query)){ $ URL _ MD5=MD5($ row[' URL ']);$ file _ folder=' img/';$文件名=$file_folder。$url_md5。'.'。jpg ';$newname=$url_md5。'.'。jpg ';if(!file _ exists($ filename)| |(file mtime($ filename)$ expire _ time * 86400 time()){ $ str。='如果不存在'。$newname。(iecapt.exe-URL='。$value['url']。- out='。$newname。) r n ';如果(($i% 30)==0 $i 0){ //每30个项目是一个批处理文件$ title=' title capt '。$ i . '。bat r n ';$字符串=$title。$ str$file_bat=fopen('img_tmp/capt '。$i . '。bat ',' w ');If (fwrite ($ file _ bat,$ str)) {echo' batch file capt '。$ i .“生成成功br”;$ str=} } $ I=$ I ^ 1;}}?运行结果:
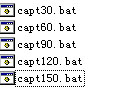
(图2)
第四,执行批处理文件
批处理文件可以通过php程序循环执行,但是在操作中会出现很多问题。这里手动批量打开刚创建的批处理文件,考虑到带宽和cpu,最大数量不要超过20个,截图速度在3-5秒/张左右。效果如图3所示:

(图3)
动词(verb的缩写)创建缩略图
生成缩略图的文件是create_image_img.php,其中包含生成缩略图的主要的一个类文件是image.class.php,两个文件的代码如下:
ceate_image_img.php代码:
?phpmysql_connect('localhost ',' root ',' 123456 ');MySQL _ select _ db(' test ');if(!isset($ _ GET[' ID '])){ $ _ GET[' ID ']=1;}if($_GET['ID']){ $sql='从' t_url id='中选择* '。$ _ GET[' ID '];$ query=MySQL _ query($ SQL);$ row=MySQL _ fetch _ array($ query);echo ' span style=' color : # ce 0000;'正在生成缩略图:$row['id'].$row['url'].brbr ';$ URL=$ row[' URL '];$ URL _ MD5=MD5($ URL);$ pictbype=$ row[' pictbype '];$ limit _ time=1;//创建$limit_time日内创建的大图,天$缩略图_文件夹=' img _ tmp/';//保存临时大图的目录,必须以/结束$缩略图_文件夹2=' img/';//保存小图的目录,必须以/结束$ output _ format=' jpg $ cache _ filename=$ thumbnals _ folder .$url_md5 .$ output _ format $ to _ filename=$ thumbnals _ folder 2 .$url_md5 .$ output _ format if((file _ exists($ cache _ filename)| | file mtime($ filename)$ limit _ time * 86400 time())!file _ exists($ to _ filename)){ if(文件大小($ cached _ filename)1024){//字节,不能是空白图片//创建缩略图包括('图像。上课。PHP’);$img=新的Zubarut _ image//获取参数$ img-image _ type=2;//1=GIF,2=JPG,3=PNG $ img-quality=80;$ img-max _ w=90;$ img-max _ h=67;$ img-is apt=($ pictbype==1)?真:假;//此处用布尔型即可,数据库不可1.非比例缩略图2.按比例缩略if($ img-GenerateThumbFile($ cached _ filename,$ to _ filename)){ echo ' span style=' color : # ce 0000;'成功创建缩略图:$row['id'].$ row[' URL '];} else { echo ' span style=' color : # 0000 ce;'未能创建缩略图:$row['id'].$ row[' URL '];} } } $sql='从t_url id中选择* '。$_GET['ID'].并且标志=1个按编号排序的(同AmericanSecurityCouncil)美国安全委员会限制1 ';$ query=MySQL _ query($ SQL);$ row=MySQL _ fetch _ array($ query);echo ' br span style=' color : # 0000 ce;'准备生成缩略图:$row['id'].''.$row['url'].brbr ';if($ row[' id ']){ echo '脚本窗口。位置。href=' create _ image _ img。PHP?ID=' .$ row[' id ']';/script ';} else { $ _ GET[' ID ']=' ';}}?image.class.php代码:
?phpclass Zubarg _ image { var $ is capt=true;var $ image _ type=-1;var $ quality=100 var $ max _ w=100 var $ max _ h=100函数SaveImage($im,$ filename){ $ RES=null;if(($this-image_type==1)!function _ exists(' imagegif ')$ this-image _ type=3;switch($ this-image _ type){ case 1://if($ this-save _ to _ file){ $ RES=ImageGIF($ im,$ filename);//}//else {//header(' Content-type : image/gif ');//$ RES=ImageGIF($ im);//} break;case 2: $res=ImageJPEG($im,$filename,$ this-quality);打破;case : $ RES=ImagePNG($ im,$ filename);打破;}返回$ res}函数ImageCreateFromType($type,$ filename){ $ im=NULL;switch($ type){ case 1: $ im=ImageCreateFromGif($ filename);打破;case 2: $ im=ImageCreateFromJpeg($ filename);打破;case : $ im=ImageCreateFromPNG($ filename);打破;}返回$ im}函数GenerateThumbFile($from_name,$to_name) { list($orig_x,$orig_y,$orig_img_type,$ img _ size)=GetImageSize($ from _ name);/* if($ this-cut _ x 0)$ orig _ x=min($ this-cut _ x,$ orig _ x);if($ this-cut _ y 0)$ orig _ y=min($ this-cut _ y,$ orig _ y);*/if($ this-is apt($ orig _ y/$ orig _ x)(90/67)){//是截图,且高度过高$ orig _ y=$ orig _ x *(67/90);} $ this-image _ type=($ this-image _ type!=-1 ?$ this-image _ type : $ orig _ img _ type);如果($orig_img_type 1或$orig_img_type 3)芯片('不支持图像类型');if($ this-image _ type==1){ $ ni=image create($ this-max _ w,$ this-max _ h);} else { $ ni=imagecreatetrue color($ this-max _ w,$ this-max _ h);} $white=imagecolorallocate($ni,255,255,255);imagefiledrectangle($ ni,0,0,$this-max_w,$this-max_h,$ white);$ im=$ this-imagecreatefrontype($ orig _ img _ type,$ from _ name);imagepalettecopy($ni,$ im);imagecopyresampled($ni,$im,0,0,0,0,$this-max_w,$this-max_h,$orig_x,$ orig _ y);if($this-SaveImage($ni,$ to _ name)){ 0返回true}否则{返回false} }?六、总结
至此整个实现网页截图并创建缩略图的的步骤结束,其中执行批处理文件部分为了提高截图效率采用手动的方式,批量打开批处理文件,另外,链接数据库部分还可以用封装的数据库操作类来实现,代码会更加简洁。
更多关于服务器端编程语言(专业超文本预处理器的缩写)相关内容感兴趣的读者可查看本站专题: 《PHP图形与图片操作技巧汇总》 、 《PHP数组(Array)操作技巧大全》 、 《PHP数据结构与算法教程》 、 《php程序设计算法总结》 、 《PHP数学运算技巧总结》 、 《php字符串(string)用法总结》 及《php常见数据库操作技巧汇总》
希望本文所述对大家服务器端编程语言(专业超文本预处理器的缩写)程序设计有所帮助。

 萌导航
萌导航 pp加速器
pp加速器 邮乐网
邮乐网 yowa云游戏手机版
 哈屏壁纸免费版
 安卓壁纸大师app
 webtoon漫画中文版
 小黄人影视2024最新版
 南瓜车管家
南瓜车管家 锦江酒店
锦江酒店 看怀集
看怀集 抬腕应用商店最新
 腾讯会议手机版
 圣婴阅读
圣婴阅读 柠檬英语软件
 苗苗清理大师
 夸磁浏览器app
 提瓦特小助手安卓版
 硬汗健身
硬汗健身 亲亲漫画
亲亲漫画


